Introduction
Yesterday, OpenAI launched its Real-Time API, enabling faster, more responsive AI-powered applications. Unlike previous implementations using speech-to-text and text-to-speech, which often suffered from latency, the new API reduces delays and provides near-instant responses. This is a game-changer for real-time chatbots, voice assistants, and video calls.
Legacy Implementation

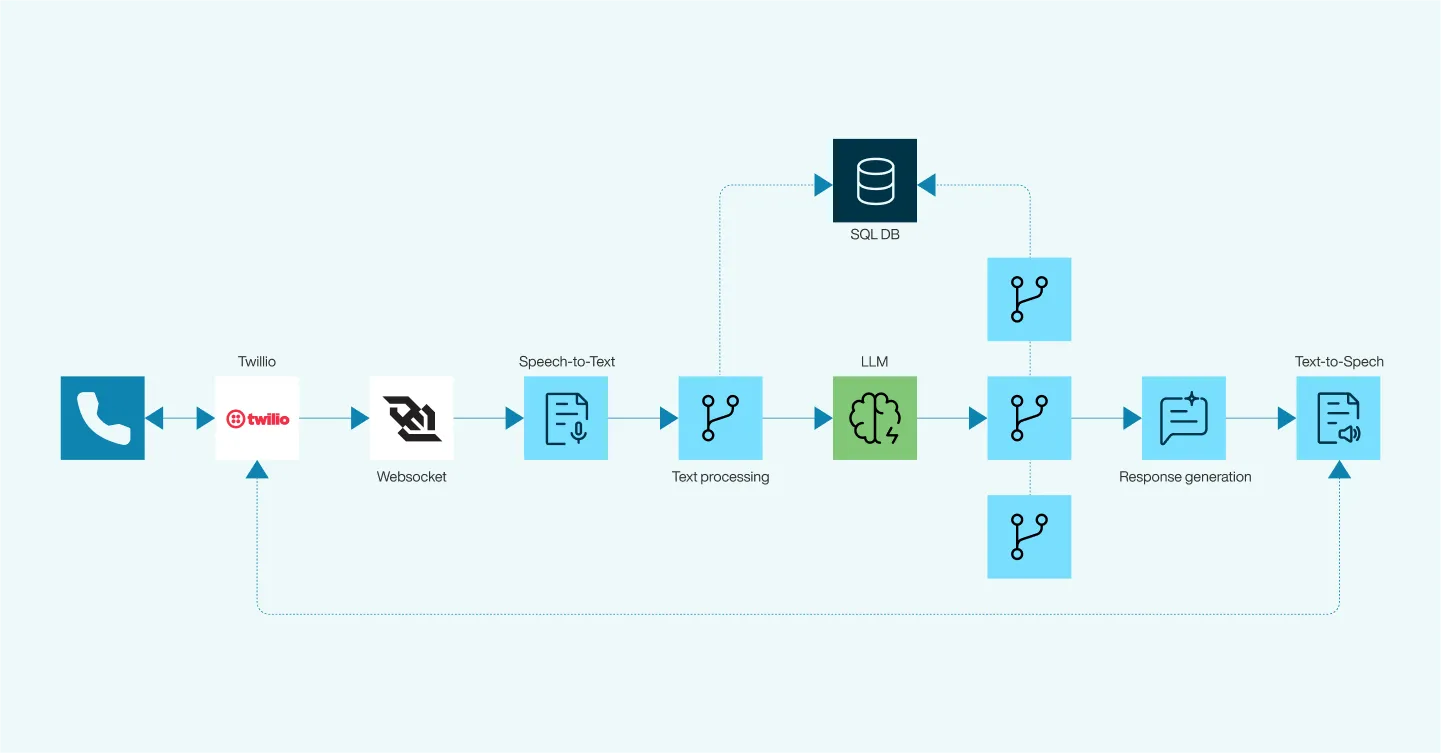
The previous implementation of voice agent systems, as depicted in the diagram, relied on several distinct stages that contributed to latency issues. Incoming voice data would first be routed through Twilio and converted from speech to text using speech recognition tools. The text would then be processed through WebSockets for real-time communication and passed into a language model (LLM) for generating a response. Once the response was ready, it would be converted back from text to speech and sent through Twilio for playback to the user. Each of these steps—speech-to-text, text processing, database queries, response generation, and text-to-speech—added delays, resulting in a sluggish user experience. Latency, especially during speech recognition and response generation, was a significant challenge, limiting the efficiency of real-time interactions.
Game Changer: How the Real-Time API Transforms AI Communication
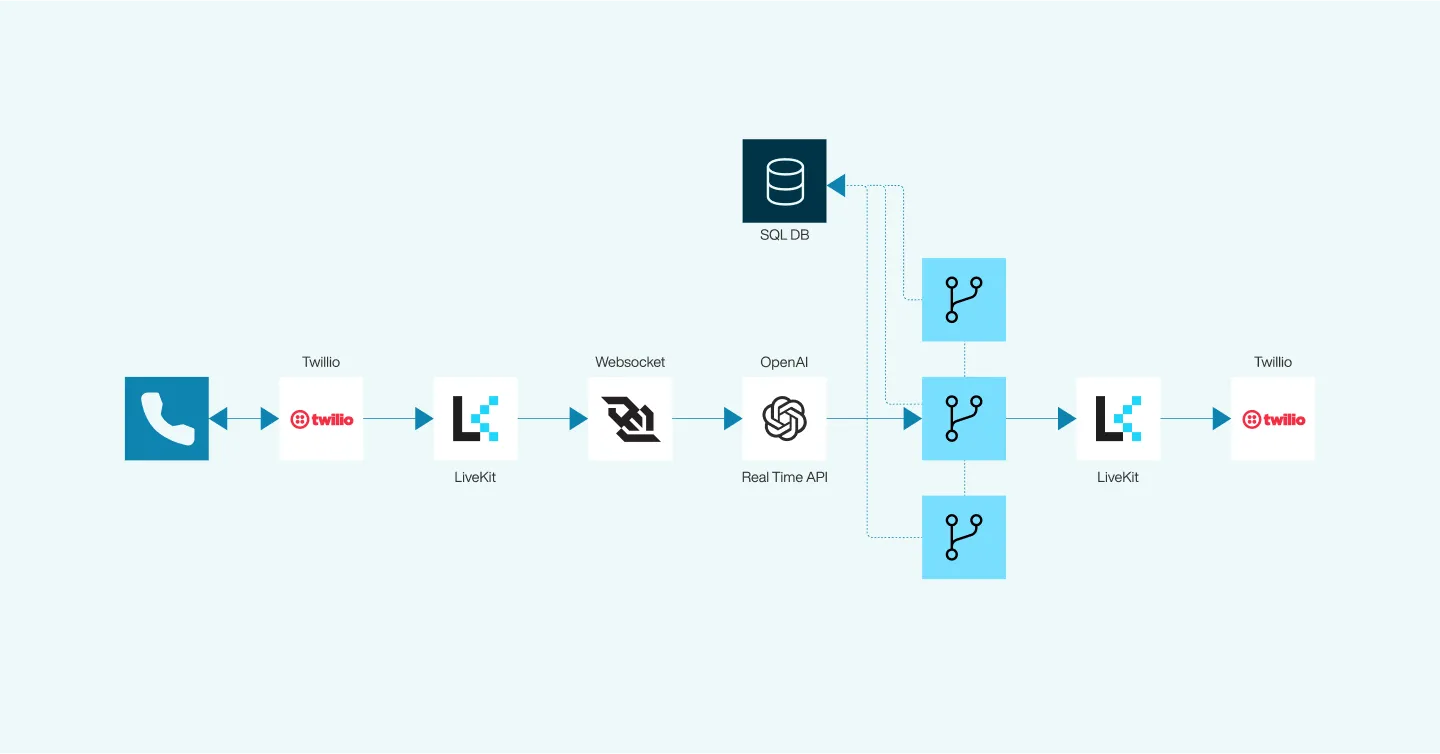
With the new Real-Time API, the process is significantly streamlined. Twilio still handles the voice input and output, but now the voice data flows directly through WebSockets to the Real-Time API, which processes the speech, generates a response, and sends it back instantly. This new approach eliminates the need for separate speech-to-text and text-to-speech steps, reducing latency dramatically. As a result, interactions happen in real time, providing a much smoother and faster experience for users in applications like voice agents and live video. LiveKit is used in this setup for echo cancellation, reconnection, and sound isolation, which also offers a wide range of possibilities.

How to Build Your Own AI-Powered Voice Agent with LiveKit and Twillio: Step-by-Step Implementation Guide
Setting up Twilio to work alongside LiveKit can be challenging due to the lack of comprehensive documentation on this integration. You may need to troubleshoot and explore various aspects on your own. In this guide, we aim to provide a step-by-step walkthrough to help you understand the essential steps needed to get started and simplify the process for you.
Step 1: Create a Twilio Account
Start by signing up for a Twilio account if you haven’t already. Simply visit Twilio’s website and follow the registration process to set up your account.
Step 2: Create a Phone Number
Once your account is ready, navigate to the Twilio Console and create a phone number. You don’t need to configure any additional settings at this stage—just select a number and you’re good to go. This number will be used to handle incoming and outgoing calls in the later steps.
Step 3: Get Your API Credentials from Twilio
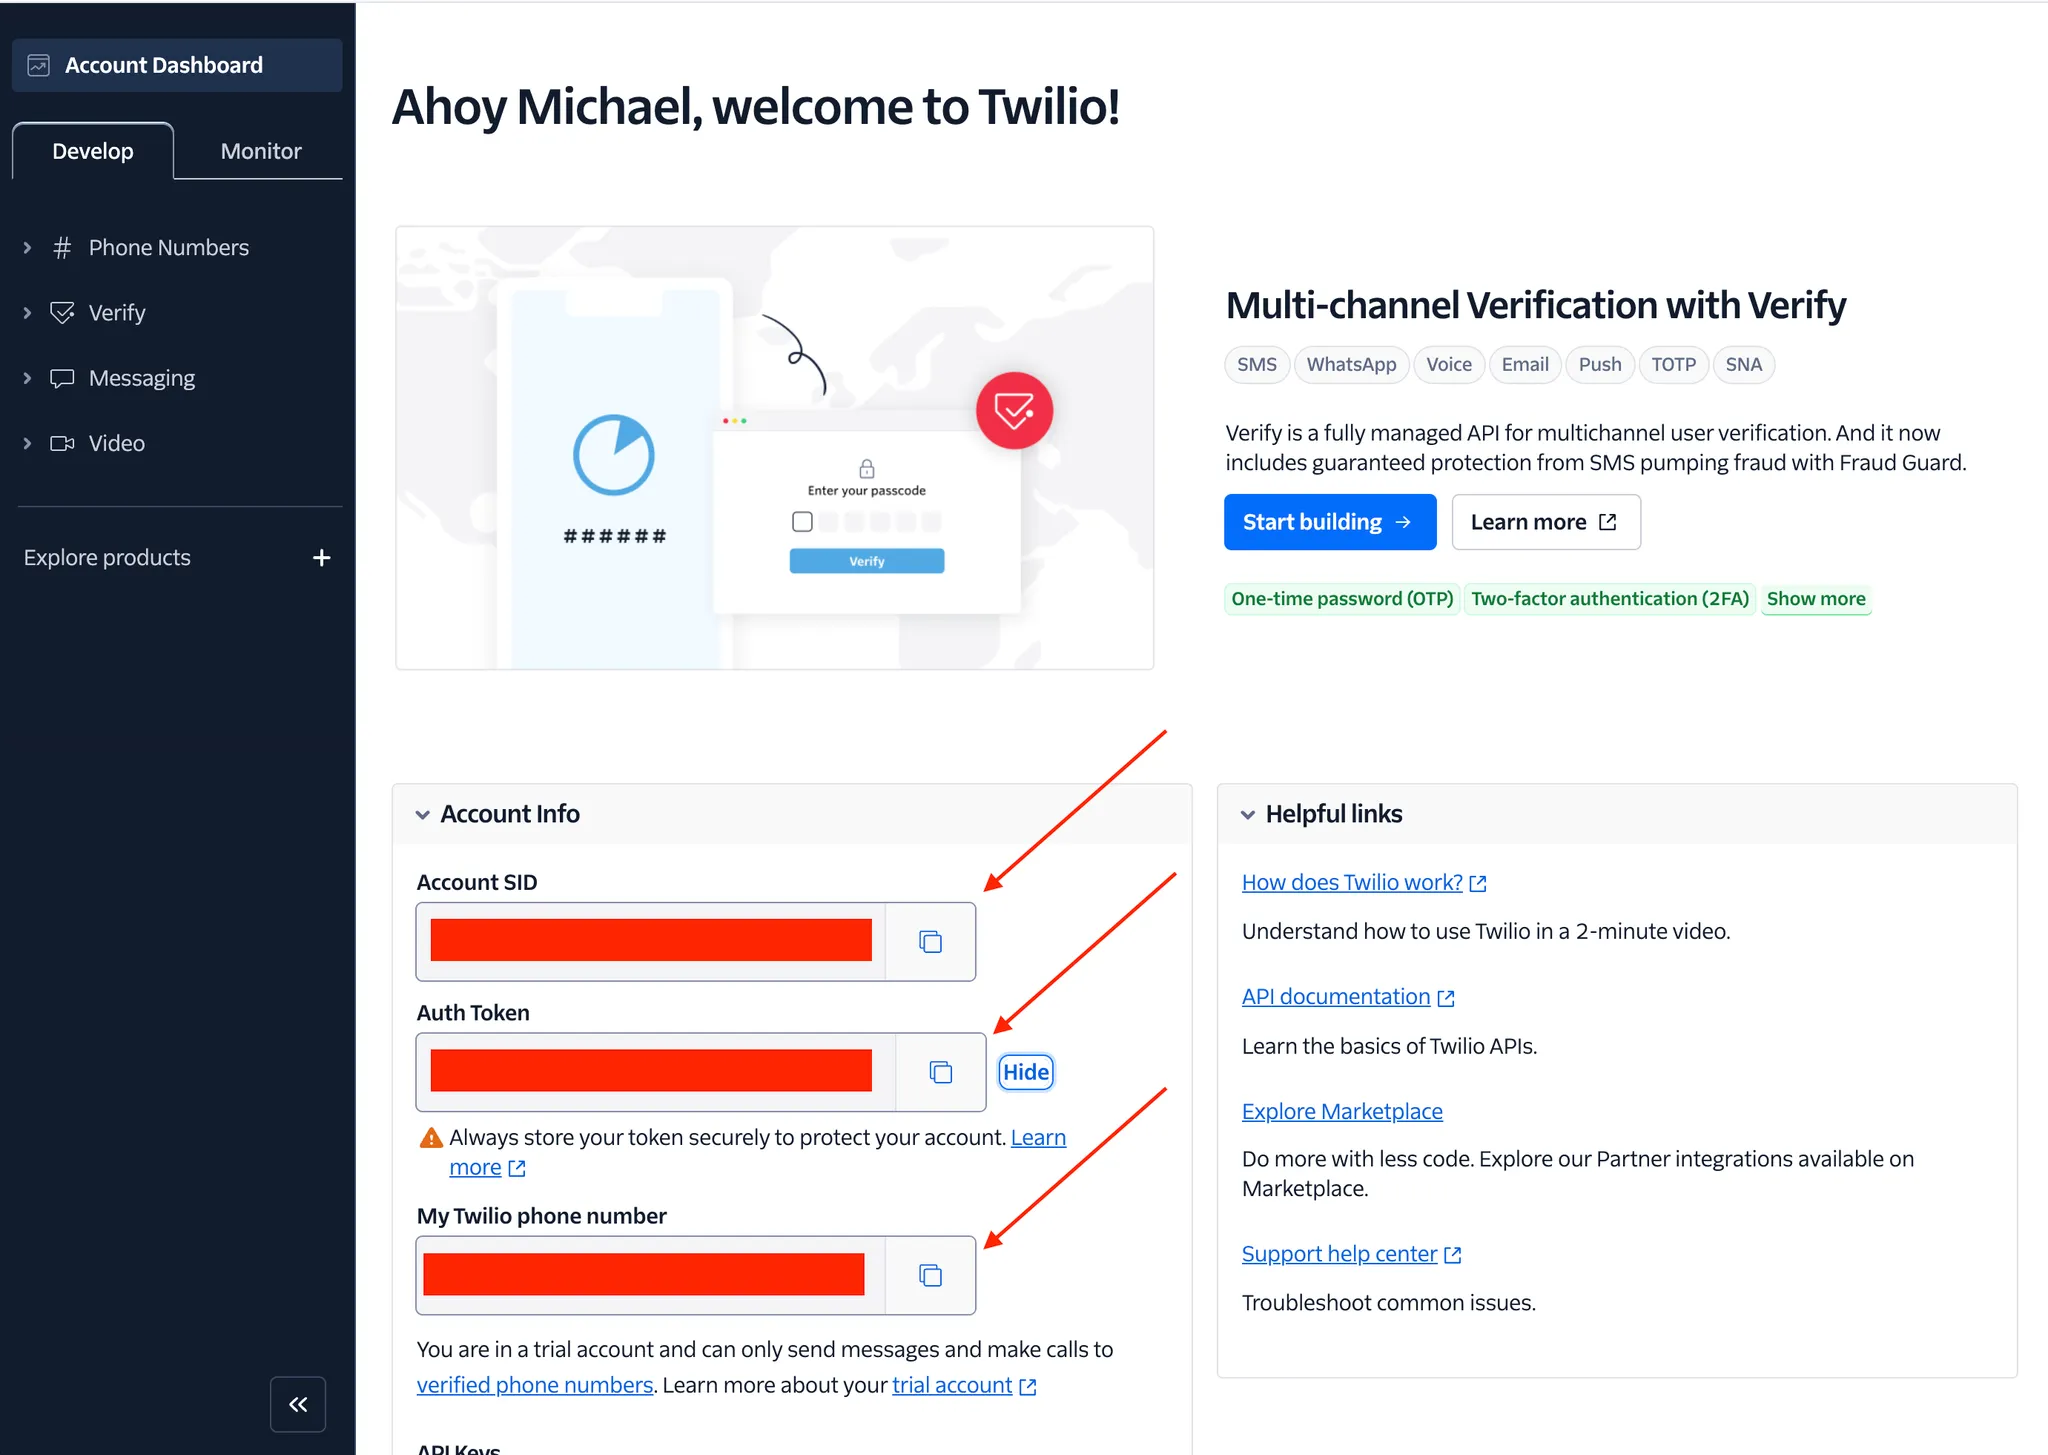
Next, you’ll need your Twilio API credentials to integrate with LiveKit. These include your Account SID and Auth Token. Follow these steps:
- Go to the Twilio Console.
- Navigate to the Account Info section.
- Copy your Account SID and Auth Token, and Twillio phone number —you’ll use these in the next steps.
Refer to the screenshot for guidance on where to find your credentials:

Step 4: Create a LiveKit Account and Project
1. Create a LiveKit Account
Sign up for a LiveKit account if you don’t have one already by visiting LiveKit’s website.
2. Create a Project
After signing up, log in and create a new project within LiveKit. This project will be used to handle real-time audio and video interactions.
3. Get the Project URL and SIP URI Parameters
Navigate to the Settings section of your newly created project and locate the Project URL and SIP URI parameters. These will be crucial in the later steps when configuring the integration.
Refer to the screenshot for guidance on where to find these parameters:
.webp)
Step 5: Simplify Complex Settings with a Script
To streamline the configuration process for Twilio and LiveKit, use the pre-built script available at the following URL: Twilio & LiveKit Integration Script.
Here’s what you need to do:
1. Download or clone the script from the link above.
2. Replace the placeholders in the script with the necessary details:
- Account SID
- Auth Token
- Phone Number
- SIP URI (found in previous steps
3. To ensure your environment is ready for Twilio, LiveKit, and OpenAI integration, install the necessary Python packages. Run the following command in your terminal:
pip install openai twilio websocket-client livekit livekit-agents livekit-plugins-openai
4. Install the LiveKit SDK
If you’re using macOS, you can install the LiveKit CLI via Homebrew:
brew install livekit-cli
5. Authenticate with LiveKit
After installation, authenticate to your LiveKit account by running the following command:
lk cloud auth
6. Run the script to automatically configure Twilio and LiveKit with the required settings, minimizing the manual setup process. It will automatically create a SIP Trunk in Twilio and make all required configurations.
This script will handle most of the heavy lifting, simplifying the integration between Twilio and LiveKit for real-time communication.
Step 6: Log in to Twilio and Update Voice Configuration on SIP Trunk
After the script has automatically created the SIP Trunk on Twilio, you’ll need to manually update the Voice Configuration to ensure everything works correctly.
.webp)
Building the AI Voice Agent with MultimodalAgent
In this final step, you’ll create the AI agent using the MultimodalAgent class, which serves as an abstraction for building AI agents that leverage OpenAI’s Realtime API. These multimodal models accept audio input directly, allowing the agent to ‘hear’ the user’s voice and capture subtleties like emotion, which are often lost during speech-to-text conversion.
Here’s an example of how to set up and run the agent:
from __future__ import annotations

import logging
import os
from livekit import rtc
from livekit.agents import (
    AutoSubscribe,
    JobContext,
    WorkerOptions,
    cli,
    llm,
)
from livekit.agents.multimodal import MultimodalAgent
from livekit.plugins import openai

# Initialize the logger for the agent
log = logging.getLogger("voice_agent")
log.setLevel(logging.INFO)

async def main_entry(ctx: JobContext):
    log.info("Initiating the entry point")
    openai_api_key = os.getenv("OPENAI_API_KEY")
    log.info(f"OpenAI API Key: {openai_api_key}")

    # Connect to the LiveKit room, subscribing only to audio
    await ctx.connect(auto_subscribe=AutoSubscribe.AUDIO_ONLY)

    # Wait for a participant to join the session
    participant = await ctx.wait_for_participant()

    # Set up the OpenAI real-time model
    ai_model = openai.realtime.RealtimeModel(
        instructions="You are a helpful assistant and you love kittens",
        voice="shimmer",
        temperature=0.8,
        modalities=["audio", "text"],
        api_key=openai_api_key,
		)

    # Initialize and start the multimodal agent
    multimodal_assistant = MultimodalAgent(model=ai_model)
    multimodal_assistant.start(ctx.room)

    log.info("AI assistant agent has started")

    # Initialize a session and create a conversation interaction
    session_instance = ai_model.sessions[0]
    session_instance.conversation.item.create(
      llm.ChatMessage(
        role="user",
        content="Please begin the interaction with the user in a manner consistent with your instructions.",
      )
    )
    session_instance.response.create()

# Entry point for the application
if __name__ == "__main__":
    cli.run_app(WorkerOptions(entrypoint_fnc=main_entry))
Summary
By following these steps, you’ve successfully created an AI voice agent that integrates with Twilio for telephony services and LiveKit for real-time communication. Leveraging OpenAI’s Realtime API enables your agent to handle audio, capturing nuances like emotion and delivering natural, instant responses. This setup opens doors for sophisticated voice-based applications, from virtual assistants to customer service automation, all powered by advanced AI and real-time communication technologies.


.svg)


